How to Set up and Optimize a Salesforce Kanban View

Kanban (看板) is Japanese for ‘visual signal.’ This agile project management tool finds its origin in lean manufacturing and was later popularized in the software and service sectors.
True to its name, the kanban board converts the project scope, progress, and flow into visual information. As a result, managers can gain a high-level view of the project developments and bottlenecks, if any.
Accordingly, they can effectively pivot the project to reduce friction and streamline processes.
Given its popularity and applicability, Salesforce introduced the kanban view to gain a graphical overview of business records. In this post, we take a look at what is the kanban view in Salesforce, how can businesses set it up and work with it, and its limitations.
What is a Salesforce Kanban view?
Before we deep-dive into the kanban view in Salesforce, let’s circle back to the basics of the kanban board - or rather, its anatomy.
Regardless of whether you use a physical board or a software application, the kanban board would typically contain the following six elements:
- Visual Kanban Cards: These signals could be in the form of tickets, sticky notes, etc., and contain project work items and the details thereof. A single card is dedicated to a standalone task or idea.
- Columns: The columns represent the various stages of the workflow. Generally, these are indicated as ‘Complete,’ In Progress,’ or ‘To Do.’
- Work in Progress (WIP) Limits: The WiP limit restricts the maximum number of cards that can be placed in a column at any given time.
- Commitment Point: The commitment point is the backlog for the board. The team can add their ideas for the project at the commitment point and they will be worked on once the project kicks off.
- Delivery Point: It is the final stage that marks the end of the kanban team workflow.
- Lead Time: Lead time is the time elapsed while traversing from the commitment point to the delivery point.
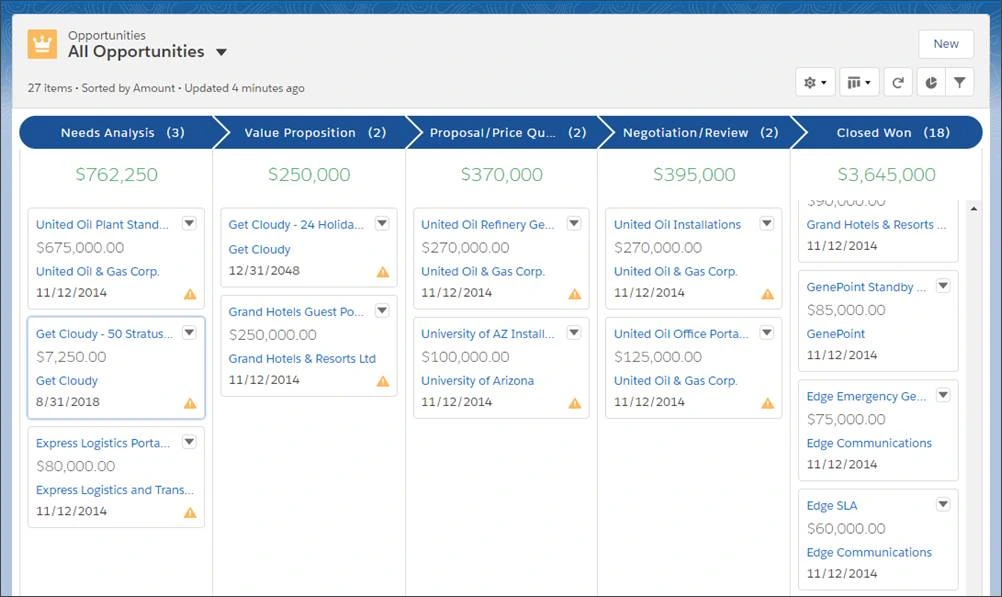
The Salesforce Kanban View is nothing but a way to view records - the sales record in this case - displayed in the kanban board format. The Salesforce kanban board may span the entire sales funnel, covering all stages from discovery to closing.
Eventually, the kanban view is an ideal tool to move sales and improve pipeline management in Salesforce.
Note: Salesforce also offers a different type of view — the list view. You can learn more about it here.
How to set up a Salesforce Kanban view
To enable the kanban view on Salesforce, first ensure that you have switched to the Salesforce Lightning Experience. Note that the Salesforce kanban view is not available in Salesforce classic.
The kanban view feature is accessible in all editions - essentials, group, professionals, enterprise, performance, unlimited, and developers.
Also, grant the application the requisite user permissions, such as permission to create list views, create, edit, or delete public list views, and Kanban settings.
Once these fundamentals are in order, you can set up Salesforce kanban in the following ways:
- To set up the Salesforce Kanban view, click on your desired object type in the head bar. In this example, we use the “Opportunities” object.
- The process remains the same for any other object type such as accounts, leads, contacts, etc. Note that the kanban view is not available for some objects, like tasks.
- You will be greeted with the “Recently Viewed Opportunities” Salesforce list view.
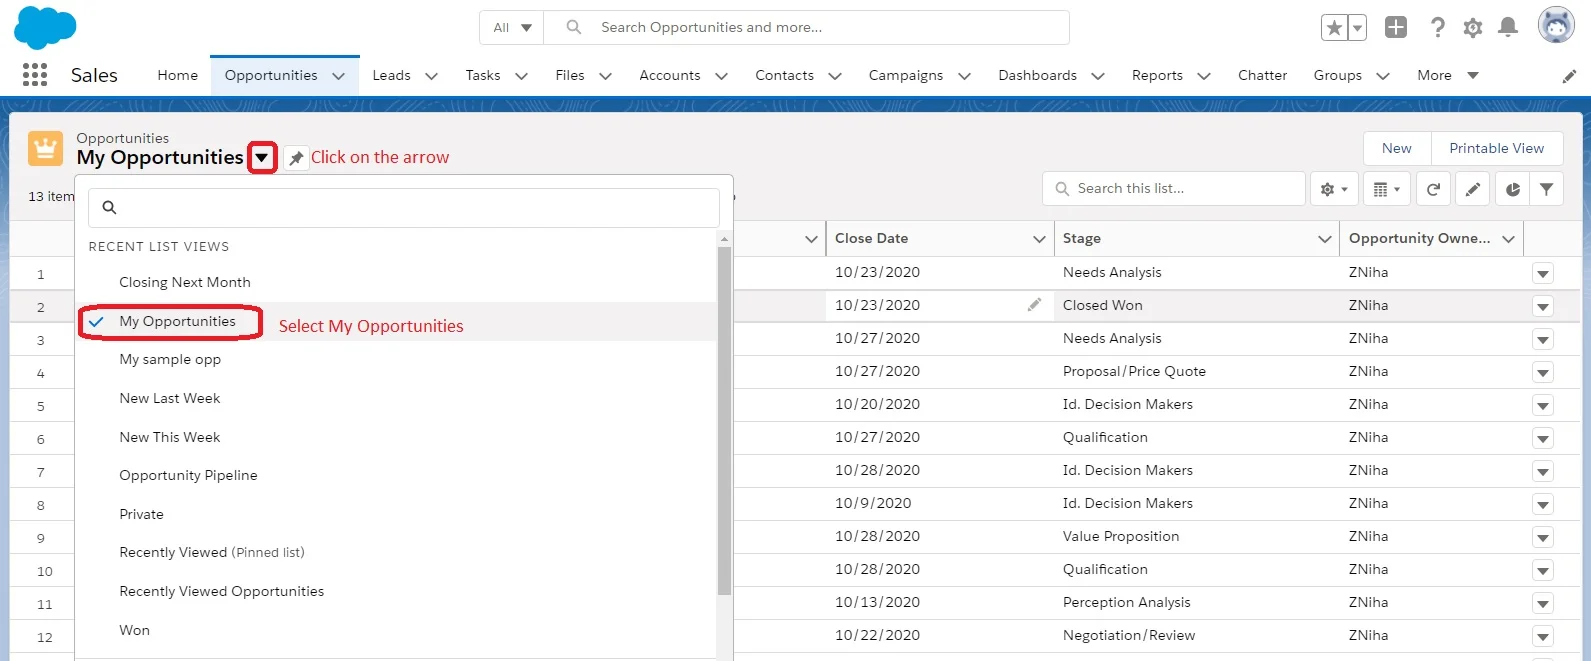
- Click on the object drop-down menu next to set a view you want to build your kanban board on. In our example, we could choose the “Recently Viewed” title to see the latest opportunities or select the “My Opportunities” option to check out your own opportunities. We are using the latter for our example.
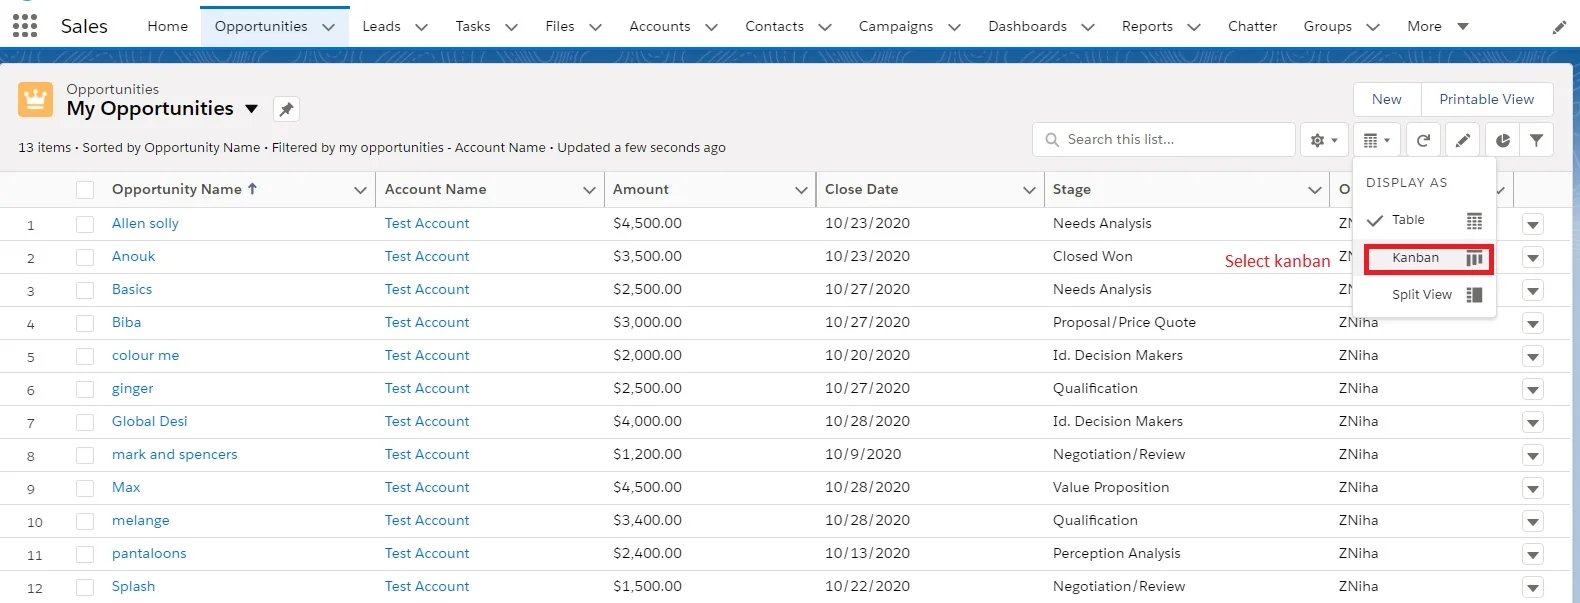
- Locate the grid icon in the top right section and switch from the Salesforce list view to the kanban view.
The display will automatically change into the kanban view with cards (in this example for every opportunity).
How to customize a Salesforce Kanban view
To configure the Salesforce Kanban view, follow the steps given below:
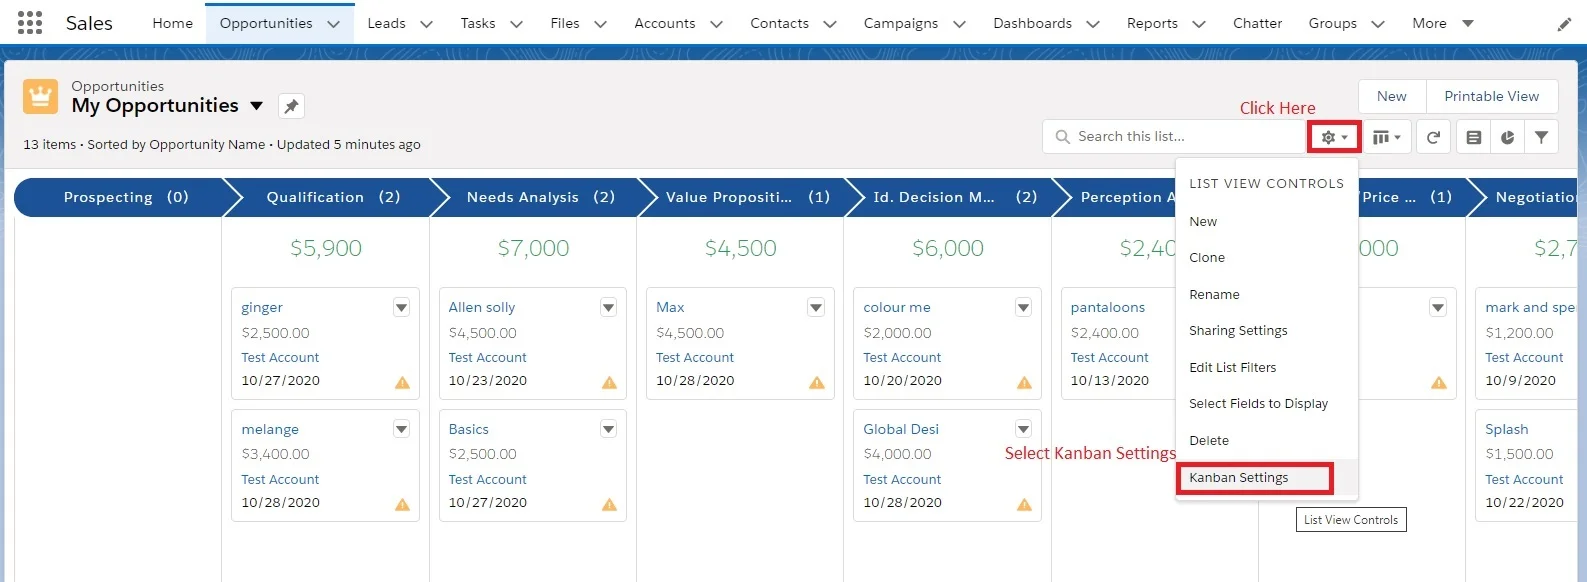
- Click on the cogwheel icon to open Kanban Settings. This menu controls the amount or the number in every column heading and column grouping.
- Under the ‘Summarize By’ drop-down menu (1), you can indicate a key number or amount for each column, such as the expected revenue or the number of opportunities.
- Select a number value or currency field, or simply bypass it by choosing ‘None.’ Say, if you were to summarize by amount, then the Kanban board will display a summary of the expected revenue at the top of each column.
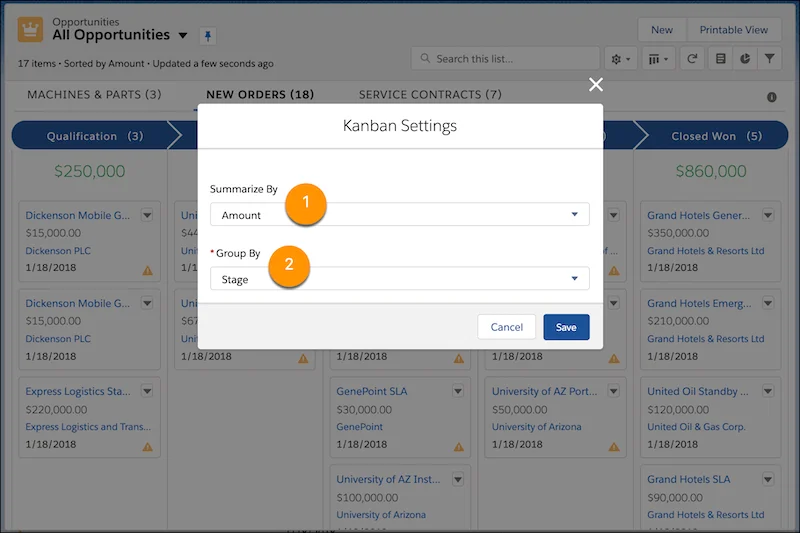
- The ‘Group By’ drop-down menu (2) allows you to group the records into columns that denote the progress you wish to track. For example, you can select the ‘Stage’ or the ‘Opportunity Owner’. Typically, sales professionals group by stage as it grants a high-level view of the entire sales cycle.
- Do note that you will have to select a value in the 'Group-by' field as the Kanban view will not display the records without a value in the ‘Group By’ field.
- Click Save.
Working with the Salesforce Kanban view
In the Kanban view, each record is displayed as a card. In our example, a typical opportunity card displays four fields - Opportunity Name, Amount, Account Name, and the Close Date - that is, the first four columns of the table view.
Here is a brief overview of how you can work with the Salesforce Kanban view:
- To locate an opportunity, you can search by keyword using the search field or filter the records on the basis of the field or record owner.
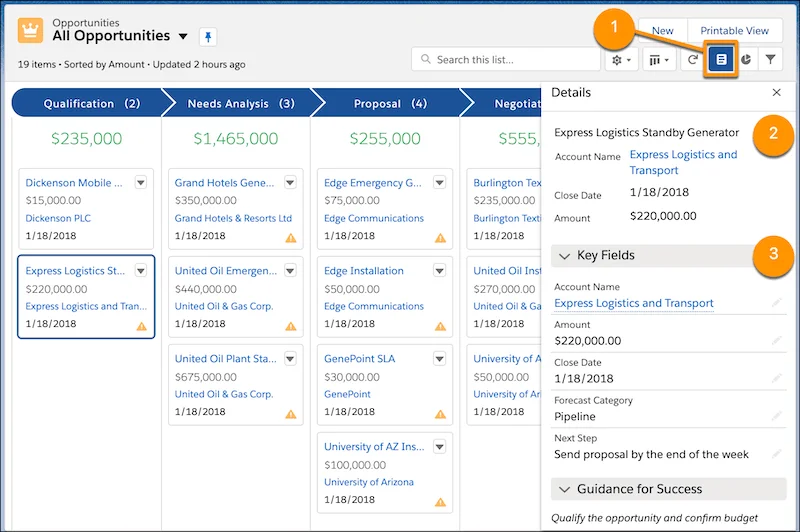
- For accessing more information about an opportunity, you can click on the “Details” panel (1) in the top-right section to view and edit the fields inline without leaving the kanban view.
- It will also display the key fields (2 & 3) and guidance for the step provided that the Salesforce admin has configured it.
- Note that Salesforce validation rules are respected when making in-line edits.
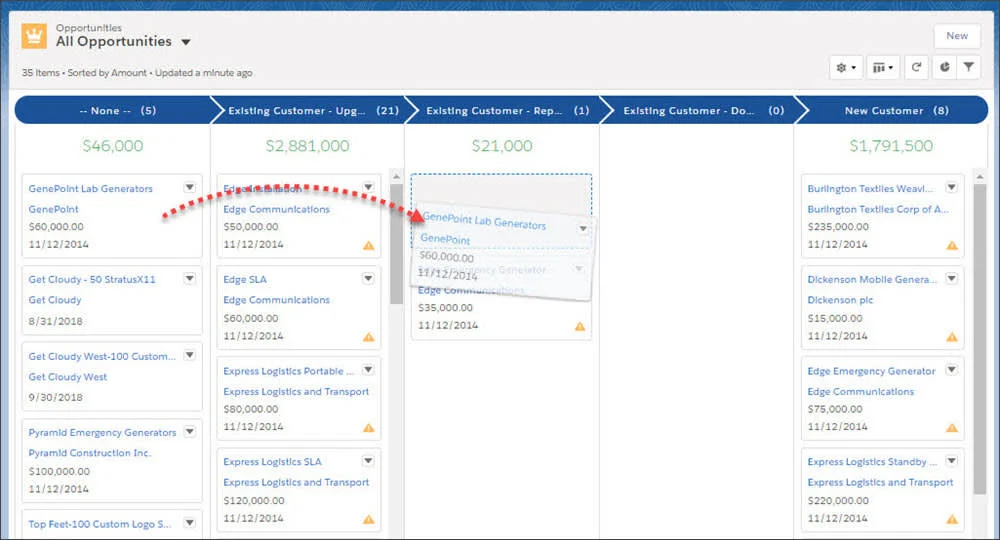
- If you are working on an opportunity that has now progressed to another stage, you can simply drag and drop the corresponding card to the appropriate column.
- Doing so will change the stage on the actual record (also reflected in the Salesforce Activity Timeline)and the subsequent updates, such as that in the amount summary, will be visible immediately.
- The tiny warning signs (yellow caution marks on the bottom-right corner of a card) indicate that no action has been taken on the opportunity in the last 30 days. You can enter a “New Task” or “New Event” to keep the deal moving.
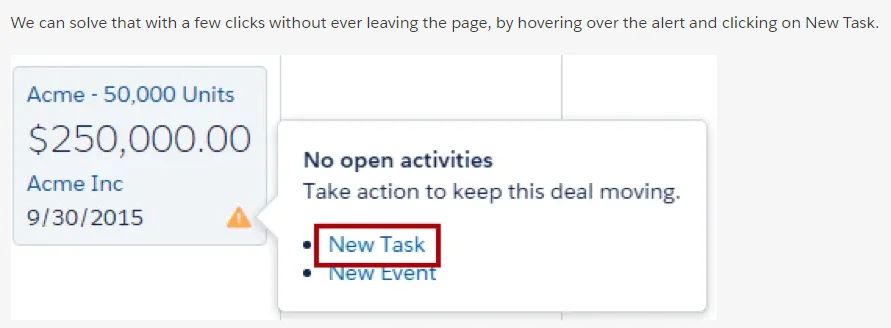
- Alternatively, this alert can also shed light on any overdue tasks to pertain to Salesforce data hygiene best practices.
- Also, keeping track of non-updated cards will improve Salesforce KPIs, such as the 'Average Sales Cycle Length' your sales team likely tracks.
Limitations of the Salesforce Kanban view
While the Kanban View in Salesforce is good for gaining a top-level, visual overview of all the ongoing activities, it is prone to certain limitations. The most important ones include:
- The Kanban view can only display a maximum of 200 cards.
- Unlike the table view, which is vast and expansive, the Kanban view reduces the opportunities to just four rudimental card fields.
- Note that the Kanban view is not available for some objects, like Salesforce tasks.
- You cannot perform mass actions or activate a contract in the Kanban view.
- You cannot convert a lead in kanban view. Plus, converted leads and closed or lost opportunities are hidden in the kanban view.
- You cannot change a record’s record type or transfer it to another user in the details panel. These would have to be edited on the card.
Create better Salesforce kanban views with Weflow - try for free.


